> ## Documentation Index
> Fetch the complete documentation index at: https://polyai-mintlify-7055a538.mintlify.site/llms.txt
> Use this file to discover all available pages before exploring further.
# Quickstart
> Connect one of PolyAI's MCP servers to your MCP client in one command.
Connect one of PolyAI's authenticated MCP servers to your MCP client — [Cursor](https://cursor.com), [Claude Code](https://www.claude.com/product/claude-code), [Claude Desktop](https://claude.ai/download), or [Codex](https://developers.openai.com/codex/cli/) — and you can drive PolyAI from your IDE in minutes.
Pick the server for the job:
Build, test, and deploy agents. Uses an **account API key** and the `/builder-mcp` endpoint.
Query conversations, transcripts, and metrics. Uses an **account API key** and the `/data-mcp` endpoint.
The steps below use Builder MCP. Data MCP connects the same way — swap the endpoint path to `/data-mcp`; the same account API key works for both. See [Data MCP → Get started](/mcp/data/introduction#get-started) for its exact commands.
## Prerequisites
You build agents inside a PolyAI workspace, so you need access to one first.
* **Enterprise customers** — PolyAI provisions your workspace during onboarding; your PolyAI representative sets it up and grants you access. Enterprise workspaces are region-specific (US, UK, or EU).
* **Getting started via the website** — sign up at [poly.ai](https://poly.ai) to create a self-serve workspace, which lives in the Studio region.
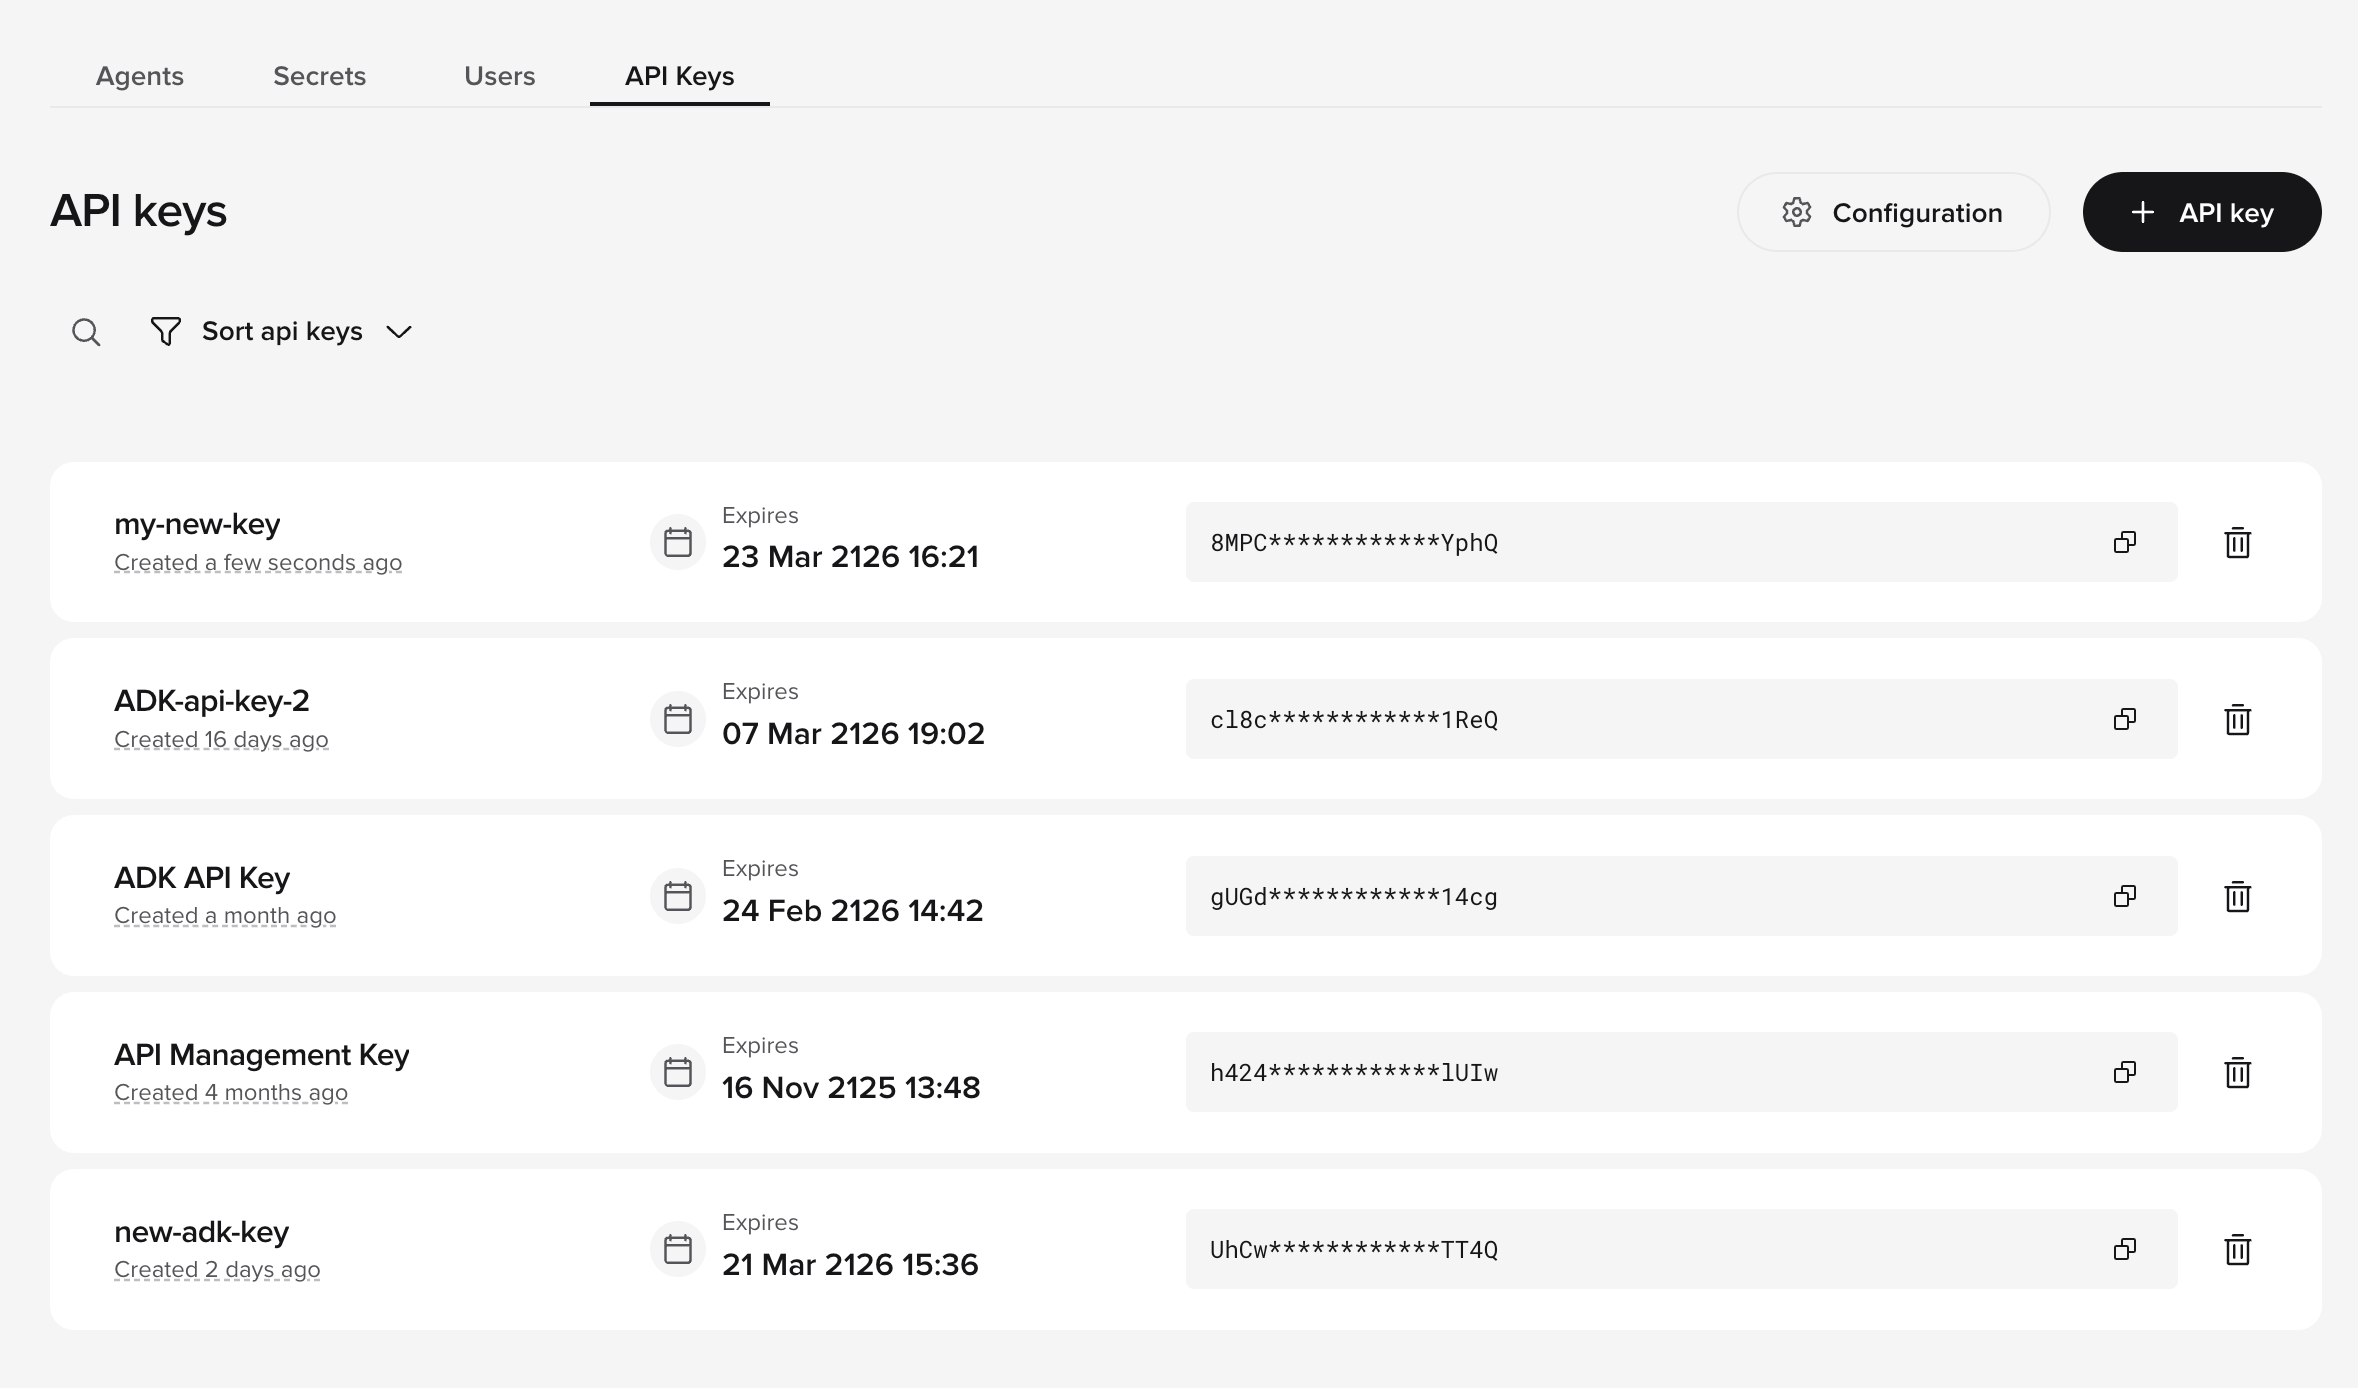
Create an **account API key** from the **API Keys** tab on your workspace homepage in Agent Studio (see [API keys](/secrets/api-keys)). The same key works for both Builder MCP and Data MCP — see [Authentication](/mcp/authentication).
Copy the value when it's shown — the full key only appears once.
 Treat the key like a password. Don't commit it or put it in client-side code.
Open Agent Studio. Your account ID is the first path segment in the URL:
```
https://studio.{region}.poly.ai/{account_id}/{project_id}/agent
```
For example, `https://studio.uk.poly.ai/acme-uk/acme-team-4/agent` → `account_id=acme-uk`.
**"Account ID" and "Workspace ID" are the same thing.** Agent Studio's UI calls this the **Workspace ID** and shows it in a prefixed form (`ws-xxxxxxxx`). The API parameter is named `accountId` (Agents and Data APIs) or `account_id` (Conversations, Chat, Webhooks, and most other APIs) — same value, different casing convention depending on which API family you're calling. Both the slug form from the URL (`acme-uk`) and the prefixed form (`ws-xxxxxxxx`) work in API calls.
## 1. Set your key and endpoint
```bash theme={"theme":{"light":"github-light","dark":"github-dark"}}
export POLYAI_API_KEY="your_api_key_here"
export POLYAI_MCP_URL="https://api.us.poly.ai/builder-mcp" # use your region and server — see below
```
| Region | Builder MCP | Data MCP |
| ------ | ---------------------------------------- | ------------------------------------- |
| US | `https://api.us.poly.ai/builder-mcp` | `https://api.us.poly.ai/data-mcp` |
| UK | `https://api.uk.poly.ai/builder-mcp` | `https://api.uk.poly.ai/data-mcp` |
| EU | `https://api.eu.poly.ai/builder-mcp` | `https://api.eu.poly.ai/data-mcp` |
| Studio | `https://api.studio.poly.ai/builder-mcp` | `https://api.studio.poly.ai/data-mcp` |
Match the region to the workspace or account your key belongs to. Connecting to the wrong region authenticates against the wrong place. See [Authentication](/mcp/authentication#pick-your-region) for how regions map.
## 2. Add the server to your client
Add to `~/.cursor/mcp.json`:
```json theme={"theme":{"light":"github-light","dark":"github-dark"}}
{
"mcpServers": {
"polyai": {
"url": "https://api.us.poly.ai/builder-mcp",
"headers": { "X-API-KEY": "your_api_key_here" }
}
}
}
```
Restart Cursor, then open the MCP settings to confirm the PolyAI tools loaded.
```bash theme={"theme":{"light":"github-light","dark":"github-dark"}}
claude mcp add --transport http polyai "$POLYAI_MCP_URL" \
--header "X-API-KEY: $POLYAI_API_KEY" \
--header "Accept: application/json, text/event-stream"
```
Verify with `claude mcp list`, then ask Claude to list its PolyAI tools.
Add to your `claude_desktop_config.json`:
```json theme={"theme":{"light":"github-light","dark":"github-dark"}}
{
"mcpServers": {
"polyai": {
"url": "https://api.us.poly.ai/builder-mcp",
"headers": { "X-API-KEY": "your_api_key_here" }
}
}
}
```
Restart Claude Desktop. The PolyAI tools appear in the tools menu.
Add to your Codex MCP config:
```toml theme={"theme":{"light":"github-light","dark":"github-dark"}}
[mcp_servers.polyai]
url = "https://api.us.poly.ai/builder-mcp"
headers = { "X-API-KEY" = "your_api_key_here" }
```
Most clients set the `Accept: application/json, text/event-stream` header for you. If a client can't connect, add it explicitly — both servers use the streamable HTTP transport.
Connecting to both servers at once? Add them under distinct names (e.g. `polyai-builder` and `polyai-data`), each with its own endpoint and key.
## 3. Verify
Ask your client to list its available tools, or test the endpoint directly:
```bash theme={"theme":{"light":"github-light","dark":"github-dark"}}
curl -s -X POST "$POLYAI_MCP_URL" \
-H 'Content-Type: application/json' \
-H 'Accept: application/json, text/event-stream' \
-H "X-API-KEY: $POLYAI_API_KEY" \
-d '{"jsonrpc":"2.0","id":1,"method":"tools/list"}' \
| grep '^data: ' | sed 's/^data: //' | jq '.result.tools | length'
```
A number greater than zero means the server is reachable and your key is valid.
## Next steps
Browse the tools, grouped by agents, data, and alerts.
Walk through the full lifecycle from branch to production.
Search conversations, read transcripts, and aggregate metrics.
Connect a live agent out to a third-party MCP server.
Treat the key like a password. Don't commit it or put it in client-side code.
Open Agent Studio. Your account ID is the first path segment in the URL:
```
https://studio.{region}.poly.ai/{account_id}/{project_id}/agent
```
For example, `https://studio.uk.poly.ai/acme-uk/acme-team-4/agent` → `account_id=acme-uk`.
**"Account ID" and "Workspace ID" are the same thing.** Agent Studio's UI calls this the **Workspace ID** and shows it in a prefixed form (`ws-xxxxxxxx`). The API parameter is named `accountId` (Agents and Data APIs) or `account_id` (Conversations, Chat, Webhooks, and most other APIs) — same value, different casing convention depending on which API family you're calling. Both the slug form from the URL (`acme-uk`) and the prefixed form (`ws-xxxxxxxx`) work in API calls.
## 1. Set your key and endpoint
```bash theme={"theme":{"light":"github-light","dark":"github-dark"}}
export POLYAI_API_KEY="your_api_key_here"
export POLYAI_MCP_URL="https://api.us.poly.ai/builder-mcp" # use your region and server — see below
```
| Region | Builder MCP | Data MCP |
| ------ | ---------------------------------------- | ------------------------------------- |
| US | `https://api.us.poly.ai/builder-mcp` | `https://api.us.poly.ai/data-mcp` |
| UK | `https://api.uk.poly.ai/builder-mcp` | `https://api.uk.poly.ai/data-mcp` |
| EU | `https://api.eu.poly.ai/builder-mcp` | `https://api.eu.poly.ai/data-mcp` |
| Studio | `https://api.studio.poly.ai/builder-mcp` | `https://api.studio.poly.ai/data-mcp` |
Match the region to the workspace or account your key belongs to. Connecting to the wrong region authenticates against the wrong place. See [Authentication](/mcp/authentication#pick-your-region) for how regions map.
## 2. Add the server to your client
Add to `~/.cursor/mcp.json`:
```json theme={"theme":{"light":"github-light","dark":"github-dark"}}
{
"mcpServers": {
"polyai": {
"url": "https://api.us.poly.ai/builder-mcp",
"headers": { "X-API-KEY": "your_api_key_here" }
}
}
}
```
Restart Cursor, then open the MCP settings to confirm the PolyAI tools loaded.
```bash theme={"theme":{"light":"github-light","dark":"github-dark"}}
claude mcp add --transport http polyai "$POLYAI_MCP_URL" \
--header "X-API-KEY: $POLYAI_API_KEY" \
--header "Accept: application/json, text/event-stream"
```
Verify with `claude mcp list`, then ask Claude to list its PolyAI tools.
Add to your `claude_desktop_config.json`:
```json theme={"theme":{"light":"github-light","dark":"github-dark"}}
{
"mcpServers": {
"polyai": {
"url": "https://api.us.poly.ai/builder-mcp",
"headers": { "X-API-KEY": "your_api_key_here" }
}
}
}
```
Restart Claude Desktop. The PolyAI tools appear in the tools menu.
Add to your Codex MCP config:
```toml theme={"theme":{"light":"github-light","dark":"github-dark"}}
[mcp_servers.polyai]
url = "https://api.us.poly.ai/builder-mcp"
headers = { "X-API-KEY" = "your_api_key_here" }
```
Most clients set the `Accept: application/json, text/event-stream` header for you. If a client can't connect, add it explicitly — both servers use the streamable HTTP transport.
Connecting to both servers at once? Add them under distinct names (e.g. `polyai-builder` and `polyai-data`), each with its own endpoint and key.
## 3. Verify
Ask your client to list its available tools, or test the endpoint directly:
```bash theme={"theme":{"light":"github-light","dark":"github-dark"}}
curl -s -X POST "$POLYAI_MCP_URL" \
-H 'Content-Type: application/json' \
-H 'Accept: application/json, text/event-stream' \
-H "X-API-KEY: $POLYAI_API_KEY" \
-d '{"jsonrpc":"2.0","id":1,"method":"tools/list"}' \
| grep '^data: ' | sed 's/^data: //' | jq '.result.tools | length'
```
A number greater than zero means the server is reachable and your key is valid.
## Next steps
Browse the tools, grouped by agents, data, and alerts.
Walk through the full lifecycle from branch to production.
Search conversations, read transcripts, and aggregate metrics.
Connect a live agent out to a third-party MCP server.